Hi! I'm Miko, one of the contributors to this blog. As my first post I'd like to show you guys a little review I made for one of my (now) favorite gunpla kits; The HGUC Victory Gundam.
Showing posts with label review. Show all posts
Tuesday, November 26, 2013
Review: HGUC 1/144 Victory Gundam (by Miko)
Hi! I'm Miko, one of the contributors to this blog. As my first post I'd like to show you guys a little review I made for one of my (now) favorite gunpla kits; The HGUC Victory Gundam.
Thursday, September 19, 2013
Bandai HGGS 1/144 MBF-P03 Astray Blue Frame Second L - Review - Part 2
Welcome back!
I'd like to apologize for the long wait, but things got a bit busy in real life. Anyway, here's the second part of the Blue Astray Review.
Gundam Wikia: MBF-P03 Second L
MAHQ.net: MBF-P03 Second L
Click here for the first part of the review
The Tactical Arms Weapons System
I'm a big fan of multiple-mode weapons systems, but even I have to admit, the TA system for the Blue Astray was quite a surprise. It's a flight pack with a "tailgun" that transforms into a cannon/artillery unit, and of course, it has a BFG (Big F***ing Sword) mode.
We've already seen it in the flight mode in the first part of the interview, and as observed, it didn;t look too good in it. Here, in Gun/Cannon mode, it looks passable.
![]() |
The two ammo clips at top and bottom are stored at the back waist plates. |
Labels:
144,
Anime,
Astray,
bandai,
Bankee,
Blue Frame,
gundam,
Gundam Seed,
HGGS,
Mecha,
model kit,
review,
scale,
science fiction,
Second L,
tactical arms,
toy,
toys
Wednesday, September 11, 2013
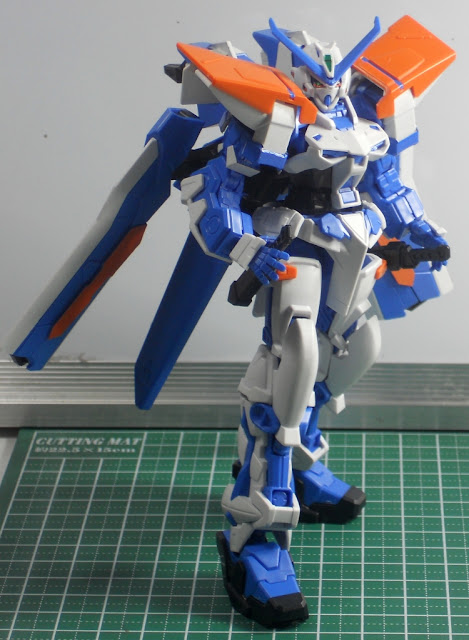
Bandai HGGS 1/144 MBF-P03 Astray Blue Frame Second L - Review
This is one of my favorite designs from Gundam Seed - scratch that, from all Gundam! The basic design is known as the Astray, and this particular variant is known as the Astray Blue, Second L.
In a nut shell, this mecha is an upgraded unit, now boasting of a multiple-mode weapon and propulsion system known as the Tactical Arms, which has three modes: a winged flight pack, a gun system, and a large sword with rocket thrusters.
For more information, you can check out the history in the following links:
Gundam Wikia: MBF-P03 Second L
MAHQ.net: MBF-P03 Second L
![]() |
Yes, it can be balanced while at a relaxed stance - but not with a straight-on, equal-footing stance. |
Labels:
144,
Anime,
Astray,
bandai,
Bankee,
Blue Frame,
gundam,
Gundam Seed,
HGGS,
Mecha,
model kit,
review,
scale,
science fiction,
Second L,
tactical arms,
toy,
toys
Wednesday, August 14, 2013
Review: HGUC 1/144 ORX-000 Messala, Part 2
Welcome to the second part of the Messala review!
(Click here for the first part of the review)
Backpack
The backpack is a combination of both simplicity and a bit of complexity - the actual backpack "shell" part has a lot of moving parts, so that the thruster pods can be positioned correctly in both forms. The thruster pods themselves have a lot of empty space inside - you would almost suspect that they want people to do LED light-up mods...
However, even with all the joints in the backpack thruster connectors, the thruster pods still tend to hit the shoulders, given the design. These pods are also the reason why you have to balance the Messala carefully, if you're going to be showing it standing on the ground - the pods make the whole mecha top heavy - and at this point, they're mostly hollow!
Monday, August 12, 2013
Review: HGUC 1/144 ORX-000 Messala
Admittedly, I've been waiting for the Messala to be updated as an HGUC kit, though one reason for that, I will reveal later. As it is, it's one large and impressive-looking kit. The Messala is a historic mecha of sorts, being the first transformable mecha to appear in the Zeta Gundam anime series.
Saturday, July 27, 2013
Review: MG 1/100 RGM-96X Jesta, Part 2
Welcome to the second part of my review of the MG Jesta. We're going tackle a few more things about the kit, stuff that I haven't covered in the first part.

I. Accessories: Shield
The shield is an asymmetrical take on the original Jegan's shield, where both grenade launchers are mounted on one side only. In the model kit, however, the big weakness of the shield is the attachment point to the backpack. There's no two ways around it, you must affix the equip arm to the backpack connector with something like white glue, or in my case, blue-tac. It's a bit disappointing, and given how stiff the joints are for the shield's equip arm (though the ways you can pose the shield thanks to it is a pleasant surprise), it's a break-point for the design.
II. Backpack
The "mobility" of the thrusters is a pleasant surprise, but the real deal is the polycap slot at the top of the back pack, as it is definitely a plug-in for the Jesta Cannon variant, I am sure. In the picture below, I've removed the top armor pieces and the top plate that covers the polycap slot.
III. Torso and Arms / Weapons and Equipment Storage
I have no complaints for the saber mount, as the design of Gundam saber handles really does mean that you have to take care of the attachment spike. On the right arm, you have space for three e-clips (or clips for solid shells, I always get confused with the rifle specs in Gundam, whether energy weapon or shell-firing). What I don't like about it is that the clips hold on by friction - again, blue-tac to the rescue, in the event the attachment becomes loose.
The rifle mount in the backplate is par for the course in Gundam Designs. By the way, the rifle's scope system and forward handle are removable. I didn't think of it much at first, but I just realized now that it paves the way for the rifle mods of the Jesta Cannon.
Conclusion
This is a great kit to have, but I will always have issues about the ankle jointing, as it makes the kit unnecessarily sensitive to what pose you can put it in without it falling over. My other issues are the shield equip arm mount, and the hands, which I feel are unnecessarily jointed (fixed hands would be better, and that's what the new Gunpla Builder Parts are for). Still, it's a great-looking kit, and sure to be a conversation piece.
And yes, there are provisions for the Jesta Cannon, so make of that what you will.
Click here for more reviews!
Tuesday, July 23, 2013
Review: MG 1/100 RGM-96X Jesta
When this kit was sent to me for review, I knew about all the hype surrounding it, given that it was, practically the Ace-Mecha Unicorn update for the Jegan (For more on the Jesta's story, click on this link).
Here are my thoughts on the kit...
I. The head
I'd have to say that the big appeal of the head is the fact that it looks like a normal man wearing a helmet, similar to the Aries in Gundam Wing. That being said, it was farily easy to do, construction-wise.
As expected these days, there is a provision for Badnai's MG light-up systems, set in the base of the neck and upper chest area.
II. Torso / Arms
1) The cockpit is simpler in terms of mechanics than the usual fiddly bits from other non-UC timeline kits. however, the way the upper chest plate locks into place actually makes opening the cockpit difficult. Given that there isn't much detail inside, this should be no problem - just deal the cockpit if you have no intentions of showing it off.
2) The torso now follows the modern construction where there is both a waist-mounted ball joint, and another joint in the midsection, for more posability. Construction, again, is amazingly simple. The shoulder mechanics may look confusing at first, but in terms of construction, again, very simple. The sad part is, unless you will show the kit off in extreme poses, you won't have much need for the superior shoudler joint articulation (hence why I didn't take photos of it...).
3) The arms also have simplified construction - to be honest I felt like I was assembling a larger version of an HGUC 1/144 kit. The hands, though, are the new super-posable ones. My advice? Get the 1/100 hand sets from Bandai and replace them. They're great for detail, but will be a nightmare in construction and painting.
4) The Jesta follows the asymmetrical load out logic that the Nu Gundam started for the arms, with a saber mount in the left forearm, and storage for three energy clips on the right.
5) Hip articulation includes the new rotating platform common in MG kits today. I personally think that this is a weakness, but so far, it looks sturdy enough - if you're not going to change the hip mount position. Unfortunately, if you want to do all the great kneeling or genuflecting positions, then you really have to reposition the peg holes in the circular hip platform.
III. Legs / Feet
1) I've already covered the hip joints in the Torso section, but here, my main beef is with the knees. If you look closely here in the first photo in this section, you'll notice that the joints can be popped out, extending clearance from knee joint to lower leg armor by roughly a centimeter. The next two photos will show exactly how much that affects mobility. I can honestly say.... why didn't they just redesign the armor? My only justification for this is that the skeleton may be used for another unit or variant kit (we'll be getting to that later).
2) the feet and ankle joints are a problem. If you want the kit to be displayed in a relaxed standing position, do make sure to add blue-tac or white glue to the joints. Otherwise, the kit will keel over one way or the other.
IV. Other Details, Part 1
1) If you're going to have grenade racks... well, to be fair, you could cut off the plastic parts that connect all three grenades together. I guess it's for stability, since it's very easy to lose grenade parts at that size.
2) Remember what I said that there could be variant kits? well, there is this swing-out part in the waist plate (see photo below, the left waist plate's top area) that is a confirmation of plans for a Jesta Cannon. I doubt the EWAC Jesta will come out, though.
ADDED: Click here for the second part of the review.
Click here for more reviews!
Here are my thoughts on the kit...
I. The head
I'd have to say that the big appeal of the head is the fact that it looks like a normal man wearing a helmet, similar to the Aries in Gundam Wing. That being said, it was farily easy to do, construction-wise.
As expected these days, there is a provision for Badnai's MG light-up systems, set in the base of the neck and upper chest area.
II. Torso / Arms
1) The cockpit is simpler in terms of mechanics than the usual fiddly bits from other non-UC timeline kits. however, the way the upper chest plate locks into place actually makes opening the cockpit difficult. Given that there isn't much detail inside, this should be no problem - just deal the cockpit if you have no intentions of showing it off.
2) The torso now follows the modern construction where there is both a waist-mounted ball joint, and another joint in the midsection, for more posability. Construction, again, is amazingly simple. The shoulder mechanics may look confusing at first, but in terms of construction, again, very simple. The sad part is, unless you will show the kit off in extreme poses, you won't have much need for the superior shoudler joint articulation (hence why I didn't take photos of it...).
3) The arms also have simplified construction - to be honest I felt like I was assembling a larger version of an HGUC 1/144 kit. The hands, though, are the new super-posable ones. My advice? Get the 1/100 hand sets from Bandai and replace them. They're great for detail, but will be a nightmare in construction and painting.
4) The Jesta follows the asymmetrical load out logic that the Nu Gundam started for the arms, with a saber mount in the left forearm, and storage for three energy clips on the right.
5) Hip articulation includes the new rotating platform common in MG kits today. I personally think that this is a weakness, but so far, it looks sturdy enough - if you're not going to change the hip mount position. Unfortunately, if you want to do all the great kneeling or genuflecting positions, then you really have to reposition the peg holes in the circular hip platform.
III. Legs / Feet
1) I've already covered the hip joints in the Torso section, but here, my main beef is with the knees. If you look closely here in the first photo in this section, you'll notice that the joints can be popped out, extending clearance from knee joint to lower leg armor by roughly a centimeter. The next two photos will show exactly how much that affects mobility. I can honestly say.... why didn't they just redesign the armor? My only justification for this is that the skeleton may be used for another unit or variant kit (we'll be getting to that later).
2) the feet and ankle joints are a problem. If you want the kit to be displayed in a relaxed standing position, do make sure to add blue-tac or white glue to the joints. Otherwise, the kit will keel over one way or the other.
IV. Other Details, Part 1
1) If you're going to have grenade racks... well, to be fair, you could cut off the plastic parts that connect all three grenades together. I guess it's for stability, since it's very easy to lose grenade parts at that size.
2) Remember what I said that there could be variant kits? well, there is this swing-out part in the waist plate (see photo below, the left waist plate's top area) that is a confirmation of plans for a Jesta Cannon. I doubt the EWAC Jesta will come out, though.
That's all for now, and tune in for the second part of this review, coming soon!
ADDED: Click here for the second part of the review.
Friday, June 14, 2013
Review: RG 1/144 Gundam Seed Destiny - Destiny Gundam
My initial reaction with Real Grade kits has always been one of suspicion, thanks to my bad experience with the RX-78-2 RG kit, which probably winds hands-down for Gundam kits that simply have too many parts that tend to fall off and get lost. However, much of my faith was restored when I assembled the RG Destiny Gundam - though I still have some major gripes about it.
Head and Torso
The head itself is rather simple, with a gray internal block that seems to have some internal details... that do not get seen anyway. Also, the front and back main sensors and the eyes are all part of one transparent piece. If you use the right set of eye stickers, you can technically make the eyes light up by simple shining a light at the back sensor. I'll take more about the stickers later.
The torso itself is... simple. Given the complex internals I saw in the RG RX-78, the Destiny's internal torso mechanics were straightforward, and definitely devoted more to mobility than internal detail. In fact, the cockpit seems to have been designed as an afterthought, and I for one am not complaining, as there are no micro-figures to show such a detail off with.
Arms and Legs
First, the arms: They are nicely proportioned, and the mechanics are top-notch. Nothing much to say, as the only extra gimmick would be the mounted boomerang-sabers at the shoulders.
As for the legs, they contain one of my major gripes - the shifting or moving parts that, while they look impressive, mechanically, don't really makes sense, since armor is supposed to be a fixed plating for protection. Still, I like the proportions, except for the Donald Duck feet - and even then... Well, I'll talk about that later.
Backpack and Accessories
The back pack and the attendant weapon accessories make sense from a toy point of view, but I'll say it now: the backpack is HUGE. And the wings look somewhat stubby when in passive mode. They look great when fully extended, though.
The rifle is a standard thing for me, no great shakes, and the shield also has more detail, but isn't much more than an upgrade of the old HGGS Destiny's shield.
And the Blast-hands? They're large! I know it's a bit of an emphasis, and it looks photogenic, but in real life, it makes the whole kit look like an overgrown.... kid.
The beam effects and the energy shield are perfectly detailed, no complaints there.
As for the NUMEROUS markings? I am not a fan. I understand if it will make it look like some sort of Ver.Ka. in 1/144 scale, it's just that it looks like it will make the mecha broder on being tattooed all over the place.
Negatives?
One gigantic negative is the fact that the Destiny can hardly stand on its own - you will really need to buy a proper action base for it, Make sure, too that it's the right kind (the smaller one for 1/144), as the kit has its own connector end for the stand. Oh, and the wrist plates? be careful, they tend to get lost.
Conclusion
I will be honest, I am not a fan of RG kits, but this Destiny kit made a believer out of me. I heartily recommend this kit to anyone who wants to collect a high-quality Gundam kit in the 1/144 scale.
Click here for more reviews!
Saturday, June 1, 2013
Review: Gundam HGUC 1/144 RX-79(G) Ez-8, Part 3
Now, about the straps for the parachute: Don't be afraid to wrap the stickers around them - the sticker and the strap's material do not form strong adhesive bonds - after some time, you can slide the straps in and out of the sticker buckles. Still, I feel bad that they had to resort to stickers, as the original HG Ez-8 had small plastic buckles that actually worked!
Again, another gripe of mine are the strap handles on the shoulders - in this new version, they are fixed in place, but in the old HG version, they are fully functional, swiveling handles.
The internal calf mounts for the beam sabers is something I highly approve of - after all, it's a mecha, so "non-anthropomorphic" storage space should be no issue.
The beam rifle looks much better to go with the Ez-8, and its design is very much similar to the RX-78 first-gen beam rifle, except that it does not have a swiveling scope, trading it in instead for a vertical-mount fixed sensor. Do take note, though, that the hand grip has a raised area to fit into a slot in the gun hand, so this rifle may not work with some hand types, unless you cut off the raised area.
This is a shot of all the accessories that the basic mecha comes with, aside from the parachute backpack.
I know, some of you may be wondering: why didn't I feature the parachute backpack more? To be honest, there isn't much value in the backpack aside from it being an addition for the accessory completist. What should be noted is that the Ez-8 is compatible with most, if not all 08thMS HGUC accessories and weapons systems, and that includes RG weapons kits. In fact, I would go so far as to say that this kit is perfect for bulking up with all the existing and incoming add-on kit packs.
Is it a good buy? My answer would be: Yes, if you plan to add more stuff to it. As it is, aside from the backpack, it's a bit thin on the accessories. Part of me thinks that a good part of the push for coming out of this kit is based on teh popularity of the mecha itself. However, I really do wish they could have added more weapons, or kept some of the original HG kits details, like the working strap buckles, shoulder strap handles, and the support pistons to display the chest with the front armor disengaged.
Me? I'd buy this kit, simply because it looks cool,and yes, it would be a worthy addition to any collection on looks alone, and would probably be a good competition entry, once you have the right accessories for it.
Monday, May 27, 2013
Review: Gundam HGUC 1/144 RX-79(G) Ez-8, Part 2
Epic posing is epic.
As with the original kit, the chest armor is removable. However, the original HG 1/144 kit had extending arms for the front chest plate, (more on that in the next article), which, while fragile, made for a more interesting build.
It's a given, of course, that the shoulder mounts ended up different, as the Ez-8 now uses the ball-joint shoulder. The advantage with this is that it allows for more posability, but the disadvantage is that it ends up with sagging shoulders more easily than the original stick joints - and even more so with the original HG version, which had no shoulder articulation beyond the basic stick and polycap joint.
The arm articulation for the new kit is actually just slightly better than the older HGUC version of the RX-79(G) standard kit.However, the older kit had full ABS joints, and this mean that as time went on (and if the person loved playing with the kit as an action figure), the joints would loosen. The current construction has returned polycaps into the center of the joints. One sticking point for the shoulders, though: the shoulder latches where the parachute straps are tied are not movable in this version, but was fully articulated in the older HG kit.
If you were wondering... yes, the backpack attachment holes are the same - you can technically use all HGUC RX-79(G) accessories with the Ez-8. And once the 08thMS GM comes along, it'll will probably be just as compatible.
In the next article: Some stickers and detail concerns.
Update: Click on the following links for the other parts of this multi-part review.
Review: Gundam HGUC 1/144 RX-79(G) Ez-8
08thMS Team was one of those sleeper hits that opened a whole new vision for Gundam - whereas Gundam tended to have a rather epic feel - a leftover from its space opera origins, 08thMS was literally a microcosm - jungle operations, earthside! And nowhere was the philosophy of the OVA more apparent than in the "upgrade" for the RX79(G) - the Ez-8. And even that is tongue-in-cheek, as the Ez-8 is basically field modifications brought about by the need for better amor and literally repairs from what was left lying around - it was a "downgrade", actually, to make it more effective in the environment it was in.
Over the next few entries, we'll take a look at the HGUC version of this kit, a worthy successor to the old HG kit.
If anything, though, the Ez-8 is rather spare in its accessories, with saber handles and translucent saber parts the only ones not being shown in this equipment photo....
The big improvement of the HGUC kit version, of course, was posability. Heck, most Gundam kits can't even kneel like this.
If you want the Ez-8 to look even more nasty, all you need are the RC Weapons Systems - some of which are seemingly made for the EZ-8, like this Shield/Claw system.
Monday, March 18, 2013
Review: HGUC 1/144 AMS-129M Geara "Zee" Zulu
I'd been wanting to get one of these kits into my collection for a long time, and from the looks of how much stuff it's got, I heartily agree that this is one superior amphibious attack mecha. Based on the Geara Zulu frame (from Gundam Unicorn), the Zee Zulu is a sleeker aquatic version that can also function as a light infantry unit on land.
As you can see with the first photo, you're not lacking in equipment, though whether that equipment looks like it's really needed.... but more on that later.
This action pose, while it shows most of its weapons, is actually a bad idea - the machine gun is kept in an airtight aquatic case, which probably tells us that you'd never see this setup in an actual battle. Still, it looks cool.
This is how it probably looks like when it's already at the combat theater, but just waiting to jump from the water. Interesting use of comabt knives, such that the hand held knives become the thumbs for the claw hands, as created by the three claws that spring out from arm mounts.
When in transit, this is probably how it looks like, all weapons folded. again, very sleek, but I doubt it will win any points for stealth.
Now, about how those blades are stored - AWESOME. The dual-blade back sheathes are so retro and "ancient warrior"-like that it's a shame that most people won't see it once you've finished the kit. It can probably fit as an emergency set of weapons for the offidcer/Sauper type, too, if you can make the blade sheathes fit under the ammo belt and back pack.
Click here for more reviews of other kits.
As you can see with the first photo, you're not lacking in equipment, though whether that equipment looks like it's really needed.... but more on that later.
This action pose, while it shows most of its weapons, is actually a bad idea - the machine gun is kept in an airtight aquatic case, which probably tells us that you'd never see this setup in an actual battle. Still, it looks cool.
This is how it probably looks like when it's already at the combat theater, but just waiting to jump from the water. Interesting use of comabt knives, such that the hand held knives become the thumbs for the claw hands, as created by the three claws that spring out from arm mounts.
When in transit, this is probably how it looks like, all weapons folded. again, very sleek, but I doubt it will win any points for stealth.
Now, about how those blades are stored - AWESOME. The dual-blade back sheathes are so retro and "ancient warrior"-like that it's a shame that most people won't see it once you've finished the kit. It can probably fit as an emergency set of weapons for the offidcer/Sauper type, too, if you can make the blade sheathes fit under the ammo belt and back pack.
This is how it looks like once it's discarded all the aquatic gear and is about to sortie. Personally, I think that if i were to get an actual kit for myself of this one, I'd ditch the flippers - they're a bit too ridiculous. Also, check out the shoulder details, very nice!
Click here for more reviews of other kits.
Friday, March 15, 2013
Review: HGUC 1/144 MS-06R1A Zaku II (Black Tri-stars)
I'll be honest, I wasn't all that hot about this particular Gundam kit - I'm not really a fan of the Black Tri-Stars in general (oh, for the days when their name was translated as the Black Trinary). However, upon assembling this kit, I was pleasantly surprised at the simple but well thought-out construction.
I admit, one issue for me was the lack of weaponry - Zaku kits are usually loaded for bear!
First off, the posability is topnotch for the upper body - a joint at the midsection and standard HGUC armo joints make sure of that. However, the legs are a bit more problematic. This isn't just a historical issue, but also one where the new lower legs are really by nature more limited in standing poses. The best solution would be to keep on some sort of stand, since it's meant to be a space unit anyway.
The backpack is very detailed, but be warned, all white parts and the red hexagon are stickers. This unit will definitely teach you to get better at basic masking.
Just like the MG kits, it comes with two antenna types - the modern "wing" type, and the old spatula version.
This is the old spatula version, both antennae have nubs you have to cut off, as you can see.
The big interesting thing: the shoulder weapons mount. Here it is with all weapons mounted. I think I forgot to mount the circular clips for the machine gun. There are two clips, and both can be mounted at waist slots. You can also choose to use the RG System Weapons version.
This is a variant on how you can mount the bazooka. Apparently, you can mount the bazooka either through the claw clamp, or through a peg/slot.
Click here for more reviews of other kits.
I admit, one issue for me was the lack of weaponry - Zaku kits are usually loaded for bear!
First off, the posability is topnotch for the upper body - a joint at the midsection and standard HGUC armo joints make sure of that. However, the legs are a bit more problematic. This isn't just a historical issue, but also one where the new lower legs are really by nature more limited in standing poses. The best solution would be to keep on some sort of stand, since it's meant to be a space unit anyway.
This is me trying to imitate a classic illustration/MSV pose.
The backpack is very detailed, but be warned, all white parts and the red hexagon are stickers. This unit will definitely teach you to get better at basic masking.
Just like the MG kits, it comes with two antenna types - the modern "wing" type, and the old spatula version.
This is the old spatula version, both antennae have nubs you have to cut off, as you can see.
The big interesting thing: the shoulder weapons mount. Here it is with all weapons mounted. I think I forgot to mount the circular clips for the machine gun. There are two clips, and both can be mounted at waist slots. You can also choose to use the RG System Weapons version.
This is a variant on how you can mount the bazooka. Apparently, you can mount the bazooka either through the claw clamp, or through a peg/slot.
I'm not sure if it's possible, but I think you can mount two bazookas into the weapons mount, barring any fit issues with the sensors and handgrips, when they're folded down.
Click here for more reviews of other kits.
Subscribe to:
Posts (Atom)