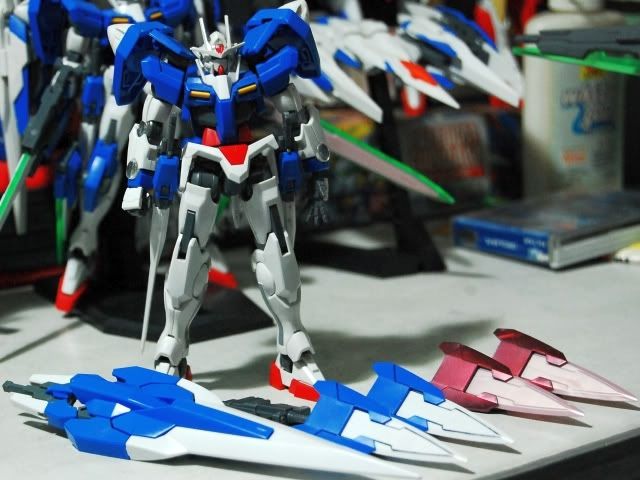
Just putting up some photos of two kits that have been in my Gundam kitbash sights lately. Originally posted in The Eclectic Chair.
Astray Noir
The Astray Noir is a limited-run kit that I figured I could do some kitbashing on. In this case, i didn't bother to try and assemble the Noir pack it came with, I simply used the Noir Pack from my original Strike Noir. Also I removed the katana blades that were attached to the pistols. While the idea of a gunblade sounds good in theory, the execution was awkward. After that, I also armed it with Duel rifles, and the shield from the Strike Noir.
Regenes Impulse
Aside from the Destiny backpack and the head parts I acquired to get the non-spiked monoeye look, this is basically the old MG Impulse that I have. I've stowed the Destiny pack into storage, so here it is with a ver.1 MG Aile Pack. I have to say, it looks like the Dagger Strike in this photo.
I'll probably have more photo ops coming up, as this two-set also tested to see how my old hangar functions as a photo booth after all this time.
Showing posts with label gunpla. Show all posts
Wednesday, April 22, 2015
Archived from Instagram: Gundam Astray Noir and Regenes Impulse
Monday, December 22, 2014
Update: Bandai HGUC Nu Gundam: Modified - Mobile Armor Mode + Shield Fighter
In the original kitbash, I basically had an HWS Nu Gundam with two shields, twelve funnels, and some pieces from my first Battle Arms set. However, as time went on, the real joke was that the design made my Nu practically immovable.
However, once I was able to acquire some Mercury Lev pieces, it opened up the mecha design.
I. Main MechaDo take note that the pieces used are from both the Strike and Nu Lev parts. There are so many more connector parts, and I suspect they will be very useful in the future.
II. Shield Fighter
The shield fighter is essentially the main body of the Battle Arms system, with two folding arms attached to the cannon/support piece that can attach to the backpack of the Nu. Needless to say, this Shield fighter can fully integrate into the Nu, which appeals to my Super Robot sensibilities.
I will most probably close further mods on this kit, so it can finally get properly painted.
For more of my kitbashes using HGBC or HGBF (Gundam Build Fighter) units, click here.
Friday, March 14, 2014
Suffering from Gunpla Burnout? Try Plamo!
Ever get that tired feeling with something you love doing, but for one reason or another it's been getting less and less fulfilling with every new project you do? That's what most people would call burnout. That state of mind where something you find fun and satisfying starts to become a chore.
Some say it's either the hobbyist, the community, or the franchise that's the main problem, but in my case it's a little bit of everything.
Earlier, at the start of the year I got tired of a full 2013 doing nothing but Gundam model kits (in 1/144, and halfheartedly finishing two 1/100). I was going through the aforementioned burnout phase. New work messed up my schedule and split my concentration, and to be honest I've been growing tired with how little I've been learning and finishing since coming back to the hobby, not to mention how I've haven't found a solid group to integrate with (although I do really feel more comfortable as some wanderer on the fringes), I've been in the events, immersed in the scene, talked with the people in the hobby and a combination of everything above just killed my mojo for these tiny plastic robots.
![]() |
Last year's work, not as much as I'd wanted done and not as fine, either. |
Labels:
1/144,
1/72,
aircraft,
Anime,
gundam,
gunpla,
historical,
hobbies,
Mecha,
military,
model kits,
plamo
Tuesday, November 26, 2013
Review: HGUC 1/144 Victory Gundam (by Miko)
Hi! I'm Miko, one of the contributors to this blog. As my first post I'd like to show you guys a little review I made for one of my (now) favorite gunpla kits; The HGUC Victory Gundam.
Monday, August 20, 2012
Gundam Gunpla Mecha Anime Model Kit Assembly
Finished some Gundam/Gunpla basic assembly requests for Bankee. The name of the event is the 2012 SM Toy Kingdom Toy Expo, it should be from Wednesday to Sunday.
Here are some photos. Click ont he photos to see them in larger sizes:

I'd love to get my own kit of this - looks like a lot of fun, and can carry one other mecha (a la Base Jabber) when in Flight mode.
I'll see if I can get more photos - as you can see, I also assembled a Delta Gundam.
Monday, July 12, 2010
HG00 1/144 GN-0000 / Odachi Weapons System
At the behest of Mike Tan, Who has correctly warned me about doing too many kits at the same time, I'm concentrating on this one.
I got this idea for a 00 variant shortly after I received my MG Astrays. So, I did research on what exactly was the term for "big sword" in Japanese, and came across three: Daikatana, Nodachi and Odachi. At first, i wanted to call this project Nodachi, but after reading the fine differences between the terms, I've decided to stick to Odachi.
Here are the weapon parts, along with one of my assembled 00 units:

So far, I've started with the basic chest. much to my concern, it turns out that the areas near the injection marks are slightly concave, so aside from doing the preliminary sanding in the pic, I may have to use some putty to flatten the areas at the shoulder/armpits. Also, After checking the top of the shoulders, am tempted to make an extra line and then paint the top of the shoulder area Grey, given that one construction seamline already makes it look like a moving part.

More to come, I've allotted at least an hour each day to this project - no hurry, really. I haven't built a kit in years, and I think this is one I should do slowly.
Wednesday, October 1, 2008
Test Review: HGGS 1/144 Murasame

Model Kit: 1/144 HGGS MVF-M11C Murasame (#39) Series: Gundam Seed: Destiny Mecha type: Transformable Mobile Suit (Atmospheric Fighter-type, second mode)
The Murasame is the frontline mass-production mobile suit of the Orb Union, one of the major factions in the Seed Destiny series. It's design is based on the older M1 Astray / M1 Astray Shrike, but it is notable in that it transforms into a jet fighter mode, serving as both a mobile suit and fighter aircraft. This makes it perfect for patrol, interceptor and heavy combat duties.

The head identifies the Murasame as an Astray descendent, with the basic large V-fin and rounded intakes at the sides of the head. Assembly-wise, the head is constructed in a standard fashion, with front and back head pieces, a red eye/chin piece, and a smaller white part that is the facemask. Head clearance from the shoulder is excellent, allowing the head to be posed extensively. Additionally, the neck tilts forward and back.
Backpack:
The torso is designed to unfold such that the front area becomes part of the nose cone of the fighter mode ? and it puts the MS cockpit into perfect fighter cockpit position. Unfortunately, the design makes the Murasame barrel-chested when looked at from the side, a fact that is not helped by the lowered chest vents and the narrow waist. The backpack has a tailfin that is connected via polycap, for movability. The wings are folded, too, in line with the sides of the backpack. The thickness of the torso and the backpack make for a somewhat ungainly balance.
On the better side, the shoulder double-hinges that facilitate transformation are well-constructed, even if they look flimsy. Internal construction for the torso and backpack pieces are relatively simple, with large parts, except for the chest vents.
Arms:
The arms are rather unusual in construction, with the shoulder armor plates made in one piece and made to fit over the actual shoulders via pegs that are held in place by U- shaped flanges. The elbow joints are unusual as well, as they are made of ABS material ? from the rotational joint to the actual elbow joint itself. The polycap shield mounts are not hidden at all, and thus the polycap parts are in plain sight.
The wrists and hands are standard design for Gundam Seed kits.

Photo: Undercarriage shot
Waist/Hip: The hip area does not have the side skirt plates mounted on it via polycap ? the waist plates are mounted on the thigh itself (more on that later). The front skirt plates are molded as one piece, with both plates connected by a rod ? but the construction allows the rod to be cut, thus making the movement of both plates independent from each other. The hip/waist area is simple in construction.
Legs/Feet:
The thighs have the connectors for the side skirt plates, connected to it by a fragile-looking ABS part. The weapon mounts on the skirts can be rotated, for better positioning. The double-jointed kneed design is excellent; all polycaps are hidden. Due to transformation mechanics, the knee armor plate is connected to the upper thigh, not to the lower leg, and this looks unusual. The knee armor also houses a connection system for the landing gear parts.
The feet are similar in construction to the feet of the Impulse and the Abyss, such that the toes fold down to compress the feet in aircraft mode.


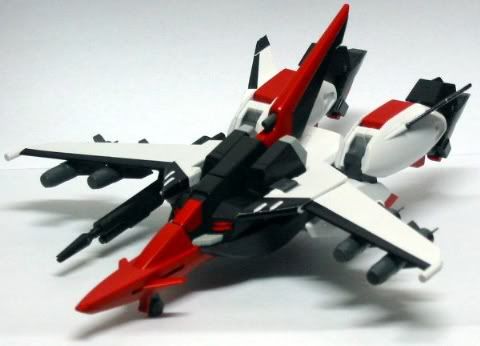
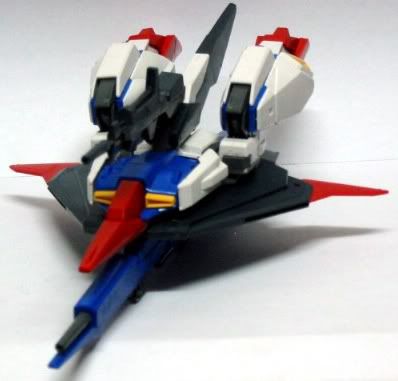
Photos: Overhead shot, comparison with HGUC Zeta's Wave Rider mode.
Weapons/Accessories:
The Murasame comes with a rather long beam rifle (as long as one of the Murasame?s legs), and a beam saber, both of which can be mounted on the side skirt plugs. The saber comes with the actual saber beam itself.
The shield, which also acts as the nose cone and undercarriage of the Murasame in flight mode, is rather large, and tends to look like an oversized shovel. The nose area of the shield also has two swing-out fins that act as the Murasame?s nose canards in flight mode.
The Murasame kit comes with a variable-position stand, and the Murasame has attachment points for mounting.
Finally, the Murasame comes with four large missiles, which can be mounted two to a wing.
Observations:
The Murasame actually looks good over all, but does not look good in certain angles. The chest and backpack areas, in particular, are rather thick, and look ungainly. The transformation mechanics are excellent, though to transform it, a part has to be attached to the hips, and the arms have to be removed. There are no major problem areas, though the forward-swept wings feel particularly vulnerable at the swing-point.
However, the Murasame looks good in a dynamic pose, and the fighter plane form is excellent.
Assembly is very easy, and the seamlines are mostly hidden, or can be used as part of the "natural lines" of the kit.

Photo: Murasame and HGUC Zeta comparison, MS forms.
Conclusion:
The Murasame is a kit worth buying, for the fact of its transformation and because it still manages to have that Astray Mystique. But compared to its UC predecessor, the Zeta (though I believe that it is more the ReGZ), the Murasame is not that good a design. But its basic look is still pleasing to the eye, and construction-wise, it is easier -- it has less parts-swapping for the two forms, making it more stable.
Click here for more reviews of other kits.
Labels:
1/144,
gundam,
gundam seed destiny,
gunpla,
HGGS,
HGUC,
model kit,
Murasame,
review,
toy,
toys,
transformable,
Wave Rider,
Zeta
Subscribe to:
Posts (Atom)