Wednesday, July 31, 2013

Bandai HGUC 1/144 Banshee Gundam Kitbash

Okay, so I thought it would be a great idea to combine as many of the Banshee weapons systems into one unit as possible, and then include the Unicorn FA Weapons System. It actually was, until the Phoenix came along. Ah, well, such is life. This mecha kitbash will still look good in my future display case.


Monday, July 29, 2013

Kotobukiya Frame Arms: RF-9 Revenant Eye with Extend Arms 01 Set + Extras

I have a bit of a history with this build, since it started out, basically, as a spare parts build.

It was a "reverse" build since I acquired the Extend Arms Set before I was able to get the Revenant Eye unit itself. I've since added upper arm armor from a Rai-type unit, and gatling guns from the special weapons set.

I decided to go with gatling weapons for the unit, since the basic look of the Revenant reminded me of a helicopter, and helicopters did have gatling weapons.

There's an official variant of the Revenant, with bright colors, here.


Saturday, July 27, 2013

Review: MG 1/100 RGM-96X Jesta, Part 2

Welcome to the second part of my review of the MG Jesta. We're going tackle a few more things about the kit, stuff that I haven't covered in the first part.

I. Accessories: Shield
The shield is an asymmetrical take on the original Jegan's shield, where both grenade launchers are mounted on one side only. In the model kit, however, the big weakness of the shield is the attachment point to the backpack. There's no two ways around it, you must affix the equip arm to the backpack connector with something like white glue, or in my case, blue-tac. It's a bit disappointing, and given how stiff the joints are for the shield's equip arm (though the ways you can pose the shield thanks to it is a pleasant surprise), it's a break-point for the design.


II. Backpack
The "mobility" of the thrusters is a pleasant surprise, but the real deal is the polycap slot at the top of the back pack, as it is definitely a plug-in for the Jesta Cannon variant, I am sure. In the picture below, I've removed the top armor pieces and the top plate that covers the polycap slot.


III. Torso and Arms / Weapons and Equipment Storage
I have no complaints for the saber mount, as the design of Gundam saber handles really does mean that you have to take care of the attachment spike. On the right arm, you have space for three e-clips (or clips for solid shells, I always get confused with the rifle specs in Gundam, whether energy weapon or shell-firing). What I don't like about it is that the clips hold on by friction - again, blue-tac to the rescue, in the event the attachment becomes loose.


The rifle mount in the backplate is par for the course in Gundam Designs. By the way, the rifle's scope system and forward handle are removable. I didn't think of it much at first, but I just realized now that it paves the way for the rifle mods of the Jesta Cannon.


Conclusion
This is a great kit to have, but I will always have issues about the ankle jointing, as it makes the kit unnecessarily sensitive to what pose you can put it in without it falling over. My other issues are the shield equip arm mount, and the hands, which I feel are unnecessarily jointed (fixed hands would be better, and that's what the new Gunpla Builder Parts are for). Still, it's a great-looking kit, and sure to be a conversation piece.

And yes, there are provisions for the Jesta Cannon, so make of that what you will.


Click here for more reviews!

Tuesday, July 23, 2013

Review: MG 1/100 RGM-96X Jesta

When this kit was sent to me for review, I knew about all the hype surrounding it, given that it was, practically the Ace-Mecha Unicorn update for the Jegan (For more on the Jesta's story, click on this link).


Here are my thoughts on the kit...

I. The head
I'd have to say that the big appeal of the head is the fact that it looks like a normal man wearing a helmet, similar to the Aries in Gundam Wing. That being said, it was farily easy to do, construction-wise.


As expected these days, there is a provision for Badnai's MG light-up systems, set in the base of the neck and upper chest area.
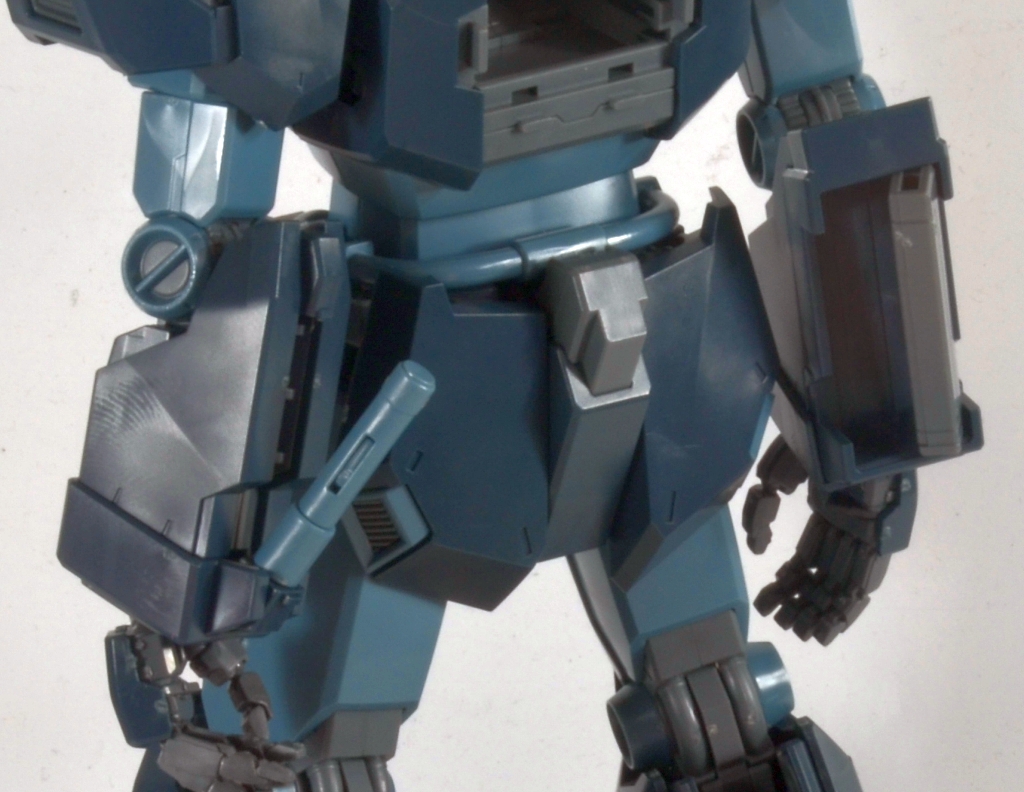

II. Torso / Arms
1) The cockpit is simpler in terms of mechanics than the usual fiddly bits from other non-UC timeline kits. however, the way the upper chest plate locks into place actually makes opening the cockpit difficult. Given that there isn't much detail inside, this should be no problem - just deal the cockpit if you have no intentions of showing it off.

2) The torso now follows the modern construction where there is both a waist-mounted ball joint, and another joint in the midsection, for more posability. Construction, again, is amazingly simple. The shoulder mechanics may look confusing at first, but in terms of construction, again, very simple. The sad part is, unless you will show the kit off in extreme poses, you won't have much need for the superior shoudler joint articulation (hence why I didn't take photos of it...). 

3) The arms also have simplified construction - to be honest I felt like I was assembling a larger version of an HGUC 1/144 kit. The hands, though, are the new super-posable ones. My advice? Get the 1/100 hand sets from Bandai and replace them. They're great for detail, but will be a nightmare in construction and painting. 


4) The Jesta follows the asymmetrical load out logic that the Nu Gundam started for the arms, with a saber mount in the left forearm, and storage for three energy clips on the right.

5) Hip articulation includes the new rotating platform common in MG kits today. I personally think that this is a weakness, but so far, it looks sturdy enough - if you're not going to change the hip mount position. Unfortunately, if you want to do all the great kneeling or genuflecting positions, then you really have to reposition the peg holes in the circular hip platform.


III. Legs / Feet
1) I've already covered the hip joints in the Torso section, but here, my main beef is with the knees. If you look closely here in the first photo in this section, you'll notice that the joints can be popped out, extending clearance from knee joint to lower leg armor by roughly a centimeter. The next two photos will show exactly how much that affects mobility. I can honestly say.... why didn't they just redesign the armor? My only justification for this is that the skeleton may be used for another unit or variant kit (we'll be getting to that later).


2) the feet and ankle joints are a problem. If you want the kit to be displayed in a relaxed standing position, do make sure to add blue-tac or white glue to the joints. Otherwise, the kit will keel over one way or the other.

IV. Other Details, Part 1
1) If you're going to have grenade racks... well, to be fair, you could cut off the plastic parts that connect all three grenades together. I guess it's for stability, since it's very easy to lose grenade parts at that size.


2) Remember what I said that there could be variant kits? well, there is this swing-out part in the waist plate (see photo below, the left waist plate's top area) that is a confirmation of plans for a Jesta Cannon. I doubt the EWAC Jesta will come out, though.


That's all for now, and tune in for the second part of this review, coming soon!

ADDED: Click here for the second part of the review.


Click here for more reviews!

Monday, July 22, 2013

Kitbash: HGUC Hazel Scout

This kitbash project came along as an idea to mimic the then-incoming HGUC GM Sniper. I dug up some references to the "hidden" HGUC unit, the Prototype RX-178 Mark II Gundam, then made the following changes:

1) Used the RG Rifle weapons system based on the 08thMS GM Sniper Rifle
2) Used the Sniper Shoulder Armor and Chest/Waist Added Armor, from the Prim Rose Add-on set
3) Used the GM Quel lower body, with a standard Hazel upper body and head.
4) Used the "bunny snout" mask and the RX-178 head vulcan unit "headphones".
5) Used the RX-178 Mark II backpack.


It fairly managed to pull off the GM sniper vibe, I think...


In "pre-drop" mode. I can imagine that this can be its mode of getting around, if it's not using the big rifle. In this case, the G-Defensor's Rifle will be used. 


I've imagined this as a space-to-reentry setup, but defintely it would be hard to use as a sort of atmospheric base jabber, particularly since the G-Defensor backpack is practically as separate ship.


A more "standard" Hazel configuration.